

티스토리 뷰
22-12-20 css기초 - 단위, 선택자, 폰트, border속성, 텍스트 속성, 텍스트 정렬, display속성, background속성
JadeStone 2022. 12. 20. 13:28교안파일
CSS 기초

-나랑 가까울 수록 가장 먼저 적용됨.
-외부 스타일 시트가 가장 많이 사용됨.
외부 스타일 시트는 index01.css 이렇게 css확장자 파일을 만들고
index01.css
p{color:red;}이렇게 속성과 값을 설정해줌.
그리고 아래처럼
<head> 안에 <link rel="stylesheet" href="index01.css"> 를 작성해줘서 적용함.
index01.html
<!DOCTYPE html>
<html>
<head>
    <meta charset='utf-8'>
    <meta http-equiv='X-UA-Compatible' content='IE=edge'>
    <title>Page Title</title>
    <meta name='viewport' content='width=device-width, initial-scale=1'>
    <link rel='stylesheet' type='text/css' media='screen' href='main.css'>
    <script src='main.js'></script>

    <!-- 외부스타일시트-->
    <!-- 가장 많이 사용하는 방법임-->
    <link rel="stylesheet" href="index01.css">

    <!-- 내부스타일시트-->
    <style>
        p{color:blue;}
    </style>


</head>
<body>

    <p>외부스타일시트</p>

    <p>외부스타일시트</p>

    <p style="color:aqua;">외부스타일시트</p>

</body>
</html>

% - 부모 태그에 대한 나의비율
em - 부모영역에 지정된 크기에 대한 나의 배수단위 // ex) 0.5em , 1em, 2em
px - 그냥 고정값을 갖는 나의 크기 , 가장 많이 사용됨.
vh - 보여지는 화면크기에 대한 비율
이렇게 4개만 알면됨.
#선택자는 정말 중요

- * : 폰트같은거 설정할 때 사용
- 위에 #header는 header태그를 말하는것이 아니라 id 속성이 header인 태그를 말함.
- .클래스 위에 .select에서 select는 클래스 이름.
★ 보통 # 이랑 . 을 가장 많이 사용.
id의 값은 단 하나로 유일해야하고.
class="이름" 여기서 클래스 이름은 똑같은게 여러개 있어도 됨.

*공백 선택자랑 > 는 비슷하지만 다름.
공백 선택자 : 자손 모두에게 적용
- > 는 바로 하위 자식에게만 적용.
  .box2 li,
  .box2 p{color:green;}
이렇게도 사용가능
.forms input[type=text]{background-color:aqua;}<!DOCTYPE html>
<html>
<head>
<meta charset='utf-8'>
<meta http-equiv='X-UA-Compatible' content='IE=edge'>
<title>Page Title</title>
<meta name='viewport' content='width=device-width, initial-scale=1'>
<link rel='stylesheet' type='text/css' media='screen' href='main.css'>
<script src='main.js'></script>
<style>
*{}/* 디자인 시작전에 전역으로 적용할 속성 margin and padding에 적용*/
b{color:red;}
#a1{color:aqua;}/*아이디*/
.b1{color:blue}/*클래스*/
.box p{color:yellow;}/*모든자식*/
.box > p{color:purple}/*직계자식*/
.box2 li,
.box2 p{color:green;}
.forms input[type=text]{background-color:aqua;}
</style>
</head>
<body>
<p>선택자</p>
<b>선택자</b>
<p id="a1">아이디선택자</p>
<p class="b1">클래스선택자#</p>
<p class="b1">클래스선택자.</p>
<div class="box">
<p>하위선택자 꺽쇠</p>
<p>하위선택자 꺽쇠</p>
<form>
<p>하위선택자 공백</p>
</form>
</div>
<div class="box2">
<ul>
<li>목록</li>
<li>목록</li>
<li>목록</li>
</ul>
<div>
<p>내용...</p>
</div>
</div>
<form class="forms">
<input type="text">
<input type="submit">
</form>
</body>
</html>

active, hover, focus 정도는 기억해두기.
<!DOCTYPE html>
<html>
<head>
    <meta charset='utf-8'>
    <meta http-equiv='X-UA-Compatible' content='IE=edge'>
    <title>Page Title</title>
    <meta name='viewport' content='width=device-width, initial-scale=1'>
    <link rel='stylesheet' type='text/css' media='screen' href='main.css'>
    <script src='main.js'></script>

    <style>
        /*마우스 닿을 때*/
        .list>ul>li>a:hover{background-color:aqua;}
        /*input에 포커스 될 때*/
        .inner input:focus{background-color: aqua;}

        /*눌렀을 때*/
        .title p:active{background-color:aqua;}
    </style>

</head>
<body>

    <div class="list">
        <ul>
            <li><a href="#">목록</a></li>
            <li><a href="#">목록</a></li>
            <li><a href="#">목록</a></li>
        </ul>
    </div>

    <div class="inner">
        <input type="text">
        <input type="text">
    </div>

    <div class="title">
        <p>active</p>
    </div>


</body>
</html>

*폰트를 지정하는 순서가있음.(당연히 외울필요는 없음)
필요할 때 w3school 에 가서 찾아보기.
font에서 size랑 weight 정도만 알아두기.
다른 것들은 보통 웹폰트를 사용함.
#웹폰트
웹폰트를 사용하면 방문자가 홈페이지에 접속면 브라우저가 웹폰트를 다운로드 받고 이 웹폰트가 적용된 페이지가 화면에 출력 된다. 구글에서는 웹 폰트를 라이브러리에 저장해 놓고 자유롭게 사용하도록 하고 있다.
<!DOCTYPE html>
<html>
<head>
    <meta charset='utf-8'>
    <meta http-equiv='X-UA-Compatible' content='IE=edge'>
    <title>Page Title</title>
    <meta name='viewport' content='width=device-width, initial-scale=1'>
    <link rel='stylesheet' type='text/css' media='screen' href='main.css'>
    <script src='main.js'></script>

    <!--1.웹폰트링크-->
    <!--
    <link rel="preconnect" href="https://fonts.googleapis.com">
    <link rel="preconnect" href="https://fonts.gstatic.com" crossorigin>
    <link href="https://fonts.googleapis.com/css2?family=Noto+Sans+KR:wght@900&display=swap" rel="stylesheet">
    -->

    <!--2.웹폰트임포트-->
    <style>
        @import url('https://fonts.googleapis.com/css2?family=Noto+Sans+KR:wght@900&display=swap');
        body, html{
            font-family: 'Noto Sans KR', sans-serif;
            font-size: 30px;
            font-weight: 900;
        }
    </style>

</head>
<body>

    웹폰트


</body>
</html>
구글 폰트에서 폰트들 무료 폰트 찾아서 사용하면됨.
*참고싸이트:
CSS에 폰트 적용하기 (웹폰트 & 폰트 파일) (velog.io)

*텍스트 속성 내용들은 잘 알아두기.
*특히 overflow는 정말 중요하니까 잘 기억해두기.

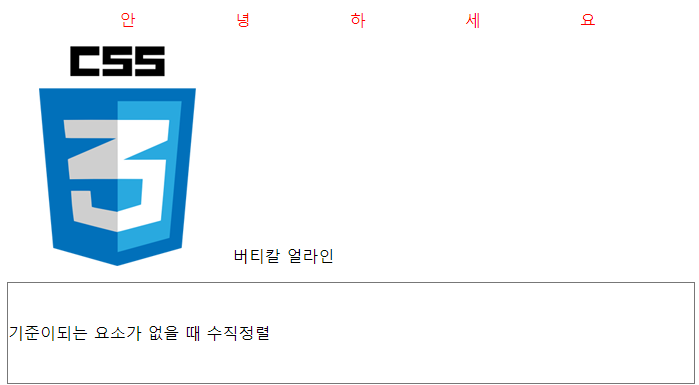
*vertical_align
기준이 되는 요소가 있어야 정렬이 가능 .
*coding404의 텍스트 정렬 팁은 그냥 외우기.
텍스트가 한줄일 때 사용가능. 텍스트가 여러 줄일 때는 사용하기 까다로워짐.
위에 언급되어있다시피
height 와 line-height 를 동일하게 맞추면 문단이 수평 가운데 정렬됨.
아래 코드 참고.
-정렬관련 코드
<!DOCTYPE html>
<html lang="en">
<head>
    <meta charset="UTF-8">
    <meta http-equiv="X-UA-Compatible" content="IE=edge">
    <meta name="viewport" content="width=device-width, initial-scale=1.0">
    <title>Document</title>

    <style>
        .tx{
            color:red;
            letter-spacing: 99px; /*글자간격*/
            text-align: right;/*글자정렬(블럭요소)*/
            }

            /*기준이 되는 나란히 배치되는 요소에 들어감*/
            .tx1 img{vertical-align: bottom;}

            /*기준이되는 요소가 없을 때 수직정렬*/
            .tx2{
                border:1px solid #777;
                height: 100px;
                line-height: 100px; /*줄간 간격*/

            }
    </style>

</head>
<body>

    <p class="tx">
        안녕하세요
    </p>

    <p class="tx1">
        <img src="img/css3.png" alt="이미지">
        버티칼 얼라인
    </p>

    <p class="tx2">
        기준이되는 요소가 없을 때 수직정렬
    </p>

</body>
</html>
-정렬코드 결과
#overflow
    <style>
        p{
            border: 1px solid #777;
            height: 100px;
            width: 300px;
        }


        .tx1{overflow: hidden;;} /*숨김*/
        .tx2{overflow: scroll;} /*무조건 스크롤 생성*/
        .tx3{overflow: auto;} /*내용이 넘칠때만 스크롤 생성*/
        .tx4{overflow: visible;} /*기본값*/


    </style>
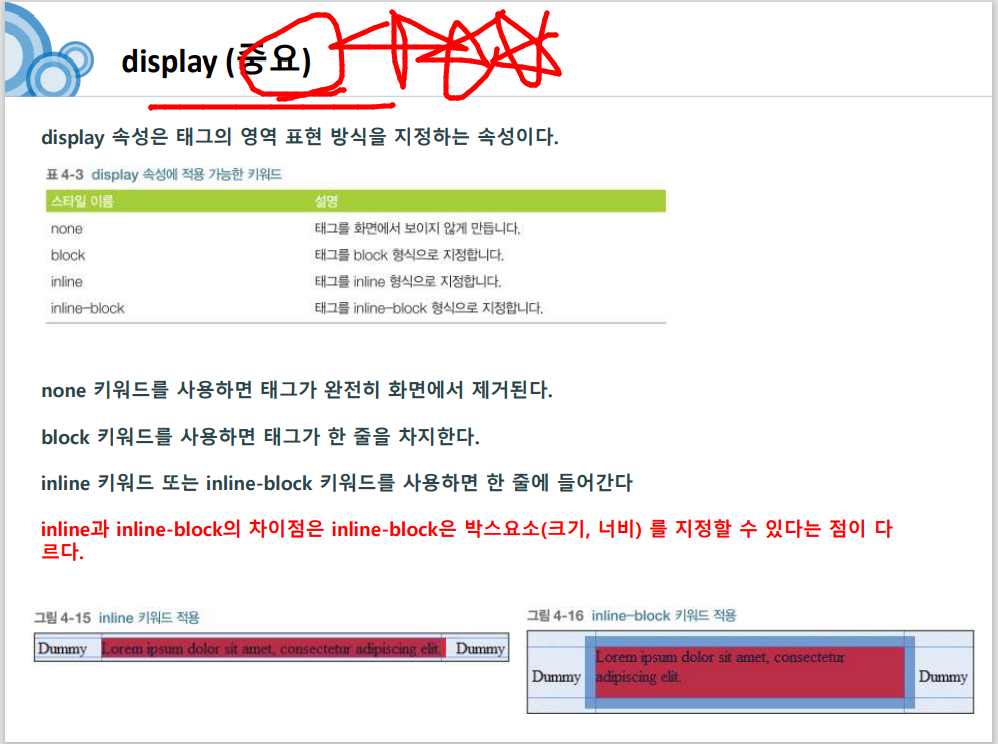
*인라인 요소에는 넓이 높이 지정이 안됨을 잘 기억하자.
그러니 인라인 요소에 높이 와 너비를 지정해주려면
inline-block 으로 블락 요소로 만들어줘야한다.
-블락성질이 있어야만 글자정렬 크기설정 등이 가능.
<!DOCTYPE html>
<html lang="en">
<head>
    <meta charset="UTF-8">
    <meta http-equiv="X-UA-Compatible" content="IE=edge">
    <meta name="viewport" content="width=device-width, initial-scale=1.0">
    <title>Document</title>

    <style>
        .list .inner{display: inline;} /*인라인요소로 변경*/

        .list2 span {display:block;} /*블럭요소로변경*/

        .list3 a{
            display: inline-block; /*인라인으로 배치, 블럭의 성질을 가지게함*/
            height: 100px;
            line-height: 100px;
            width: 100px;
            text-align: center;

        }

        .box{display: none;}/*숨기기*/


    </style>

</head>
<body>

    <div class="list">
        <div class="inner">블럭</div>
        <div class="inner">블럭</div>
        <div class="inner">블럭</div>
    </div>

    <div class="list2">
        <span>인라인</span>
        <span>인라인</span>
        <span>인라인</span>
    </div>

    <div class="list3">
        <a href="#">인라인</a>
        <a href="#">인라인</a>
        <a href="#">인라인</a>
    </div>

    <div class="box">
        <p>디스플레이 none</p>
    </div>

</body>
</html>
#속성 실습
<!DOCTYPE html>
<html lang="en">
<head>
    <meta charset="UTF-8">
    <meta http-equiv="X-UA-Compatible" content="IE=edge">
    <meta name="viewport" content="width=device-width, initial-scale=1.0">
    <title>Document</title>

    <style>
        *{list-style: none; padding: 0; margin:0;} /*리스트의 점 없앰, 여백제거*/

        /* .nav{text-align: center;}
        .nav li{display: inline;}
        .nav li a{
            display: inline-block;
            height: 100px;
            line-height: 100px;
            width: 100px;
            text-decoration: none; /*밑줄제거*/
        } */

        /* 실습내용
        .header li{display: inline;}
        .header{text-align: center;}
        .header li a{
            display: inline-block;
            height:100px;
            line-height: 100px;
            width: 100px;
            text-decoration: none;
        }

        .header{background-color: black; color: white;}
        .header li a{color: white;}
        .header li a:hover{background-color: red;} */

        /*내 연습 내용*/
        /* header{text-align: center;} */

    </style>

</head>
<body>

    <!-- <ul class="nav">
        <li><a href="#">목록</a></li>
        <li><a href="#">목록</a></li>
        <li><a href="#">목록</a></li>
        <li><a href="#">목록</a></li>
    </ul> -->


    <style>
        #header{
            background-color: #000;
            color:#fff;
            text-align: center;   /*header에 정렬을 center로 해두면 자식태그들의 내용도 같이 정렬된다*/
        }
        .wrap ul li{display: inline;}
        .wrap ul li a{
            display: inline-block;
            height: 100px;
            line-height: 100px;
            width: 100px;
            color: #fff;
            text-decoration:none;
            font-size: 20px;
            font-weight: 500px; /*글씨 굵기를 나타냄*/
        }

        .wrap ul li a:hover{
            background-color: #777;
        }

    </style>

<header id="header">
    <h3>목록만들기</h3>
    <nav class="wrap">
        <ul>
            <li><a href="#">메뉴</a></li>
            <li><a href="#">메뉴</a></li>
            <li><a href="#">메뉴</a></li>
            <li><a href="#">메뉴</a></li>
            <li><a href="#">메뉴</a></li>
        </ul>
    </nav>
</header>

    <!-- <header class="header">
        <h3>목록만들기</h3>
        <nav>
            <ul>
                <li><a href="#">메뉴</a></li>
                <li><a href="#">메뉴</a></li>
                <li><a href="#">메뉴</a></li>
                <li><a href="#">메뉴</a></li>
                <li><a href="#">메뉴</a></li>
            </ul>
        </nav>
    </header> -->

    <header>test</header>

</body>
</html>

<!DOCTYPE html>
<html lang="en">
<head>
    <meta charset="UTF-8">
    <meta http-equiv="X-UA-Compatible" content="IE=edge">
    <meta name="viewport" content="width=device-width, initial-scale=1.0">
    <title>Document</title>

    <style>
        p{
            border: 1px solid #777;
            width: 300px;
            height: 300px;
        }
        .tx1{
            background-color: aqua;
            background-image: url('img/bgimg.png');
            background-repeat: no-repeat;/*repeat;*/
            background-size: 100px;
            background-position: -20px -20px; /*100% 100%;*/ /*왼,위*/
        }
    </style>

</head>
<body>

    <p class="tx1">
        우리집 강아지는 장군이 인데, 참 속을 많이 썪인다.<br>
        정신차리자<br>
        정신차리자<br>
        정신차리자<br>
    </p>

</body>
</html>
위의 결과 창

<!DOCTYPE html>
<html lang="en">
<head>
    <meta charset="UTF-8">
    <meta http-equiv="X-UA-Compatible" content="IE=edge">
    <meta name="viewport" content="width=device-width, initial-scale=1.0">
    <title>Document</title>

    <style>
        *{padding: 0; margin:0;}
        header{height:300px; background-color: aqua;}
        article{
            height:500px;
            background-image: url('img/back.jpg');
            background-attachment: fixed; /*scroll;*/
            background-size: contain; /*백그라운드가 잘리지 않도록 하고, 나머지는 비움*/
            background-size: cover; /*빈공간없이 채워줌,나머지는 자름*/
        }
        section{height: 100vh; background-color: pink;}
        footer{height:300px; background-color: yellow;}
    </style>

</head>
<body>

    <header>
        헤더...
    </header>

    <article>
        글영역...
    </article>

    <section>
        본문...
    </section>

    <footer>
        푸터...
    </footer>

</body>
</html>
결과


<기억할 것>
* ctrl +/, alt+ shift +a : 주석
* ctrl + shift + k : 행삭제
* 새 html 파일을 만들었을 때 html 형식을 갖고오려면
html 을 치고 ctrl + spacebar 를 누르고나서 html:5 를 누르면 됨.
*실행창(웹) 키는 단축키는 alt + l 누르고 나서 alt + o
'CSS' 카테고리의 다른 글
| 22-12-26 반응형 디자인, 부트스트랩 (0) | 2022.12.26 |
|---|---|
| 22-12-23 CSS - 디자인 실습 (0) | 2022.12.23 |
| 22-12-22 css - 박스레이아웃(position) (1) | 2022.12.22 |
| 22-12-21 css기초- 패딩과마진 , 박스사이징,박스레이아웃, float (0) | 2022.12.21 |
| 22-12-13 CSS시작 - VS코드 설치(개발환경셋팅), HTML태그 (0) | 2022.12.13 |
- Total
- Today
- Yesterday
- 다중 반복문
- interface #자바
- 자바수업
- 국비지원 학원 수업 내용
- 오코노라멘
- 자바#자바수강기록
- 박문석 선생님
- 중앙정보처리학원
- 데이터베이스 수업
- api 활용
- 배열과 탐색
- 알람 시계 문제
- 자바
- 내포 클래스
- 강남 중앙정보처리학원
- 조건문
- 자바 api
- 가비지 콜렉팅
- 박인욱 강사님
- FOR문
- 국비학원 수업
- nasted class
- 배열의 정렬
- 강남역 12번 춣구
- 배열 삭제
- input 스트림
- JS ES6 문법
- 자바스크립트 ES6 문법
- 국비학원
- output 스트림
| 일 | 월 | 화 | 수 | 목 | 금 | 토 |
|---|---|---|---|---|---|---|
| 1 | 2 | 3 | ||||
| 4 | 5 | 6 | 7 | 8 | 9 | 10 |
| 11 | 12 | 13 | 14 | 15 | 16 | 17 |
| 18 | 19 | 20 | 21 | 22 | 23 | 24 |
| 25 | 26 | 27 | 28 | 29 | 30 | 31 |