23-02-13) 스프링부트 3강 - thymeleaf 템플릿 사용법 ( 타임리프 구문)
3강
1. thymeleaf템플릿 사용법

*스프링 부트의 기본 뷰.
*반드시 spring-boot-starter 모듈로 받아야지 별다른 설정없이 자동으로 연결이 됨.
*우리는 자동완성 기능없이 수동으로 할것.
<타임 템플릿 사용>
# 파일 생성시 주의 !!

templates 폴더가 베이스 폴더가 됨.
컨트롤러에서 경로 설정시 여기서부터 경로가 시작된다는 말.
따라서 templates 폴더 아래에다가 view 파일들을 만들어야함.
*컨트롤러
@Controller
@RequestMapping("/view") //templates가 베이스폴더가 됨.
public class ThymeleafController {

	@GetMapping("/ex01") //get방식
	public String ex01() {
		return "view/ex01";
	}

}
★★★ 어떤 속성이든간에 타임리프 문법을 사용할 거다 한다면
속성 앞에 다 th: 를 붙여주면 된다. ★★★

* 타임리프구문을 사용할 떄는 명시적으로 상단에 네임스페이스를 넣어줌.
xmlns:사용명 을 명시함. (해주는게 좋음)
(위에 tymeleaf.org 로 고쳐져야함)
* 빨간색 부분만 잘 암기해두기.
- a태그에 링크를 걸고 싶으면 @{} 에 경로를 적어주면 됨. 경로는 @이다.
타임리프구문 없이 그냥 href 만 쓰면 정적인 경로, 주소값 그 자체로만 쓸 수 있음.
타임리프구문을 사용하면 동적으로 값을 줄 수 있음.
-fragment expression 은 include와 같음. frag링크에서는 ~{} 로 사용
- 문자는 '' (홑따옴표)
- 텍스트 결합 은 + .

* 타임리프 3.x 에서는 html 태그없이 출력이 가능한데
[[ ${'출력문'} ]] 이렇게 출력이 가능.
*th:with 변수명 설정.
-th:with="var1=${user.name}"
*else 구문은 unless 로 쓴다.
이 때 unless 에도 if문과 동일한 조건을 적어줘야 함.
	<!-- if else문 : unless는 동일한 조건을 적습니다-->
	<div th:with="a = 10">
		<span th:if="${a != 10}">10이 아닙니다</span>
		<span th:unless="${a != 10}">10 입니다</span>
	</div>
* else if 문은 없기 때문에 그냥 if 문으로 다 써준다.
* ex01.html 파일
<!DOCTYPE html>
<html xmlns:th="http://www.thymeleaf.org"><!-- 타임리프 명시적 선언 -->
<html>
<head>
<meta charset="UTF-8">
<title>Insert title here</title>
</head>
<body>

	<h3>타임리프 출력과 변수</h3>

	<!--  타임리프 문법을 사용하려면 속성앞에 th를 붙입니다 -->

	<h3 th:text="${'헬로월드'}"></h3>
	<h3>[[${'헬로월드'}]]</h3>

	<h3 th:text="${1==1}"></h3>
	<h3>[[${ 1 == 1}]]</h3>

	<h3 th:text="${true and false}"></h3>
	<h3>[[${true and false}]]</h3>

	<h3>[[${'가' eq '가나다'}]]</h3>

	<hr/>

	<!-- 변수선언 -->
	<div th:with="a = 10">
		[[${a}]]
	</div>
	<!-- 표현은 위와같이 쓰는게 우리에게 익숙하기 때문에 위와같이 더 많이 사용함. -->
	<div th:with="a = '홍길동'" th:text="${a}">

	</div>

	<!-- value 속성의 사용 -->
	<!-- 어떤속성이든 (여기서는 value) 간에 타임리프구문을 사용하고 싶다면 속성앞에 th: 를 붙여주면 됨. -->
	<div th:with="a = '이순신'">
		<input type="text" th:value="${a}">
	</div>

	<!-- if 문 -->
	<div th:with="a=10">
		<span th:if="${a == 10}">[[${a + '입니다'}]]</span>
		<span th:if="${a == 20}">[[${a + '입니다']]</span>
	</div>

	<!-- if else문 : unless는 동일한 조건을 적습니다-->
	<div th:with="a = 10">
		<span th:if="${a != 10}">10이 아닙니다</span>
		<span th:unless="${a != 10}">10 입니다</span>
	</div>

	<!-- 삼항연산자 -->
	<div th:with="a = 10">
		[[${a == 10 ? '참' : '거짓'} ]]<br/>
		[[${a} == 10 ? '참' : '거짓' ]]
	</div>


</body>
</html>
---- 여기서부터는 ex02.html 에서 확인 ----
*th:each 반복문 에서는 향상된 for문만 제공이 된다. (일반 for문은 없다)
- each에 두번째 변수를 선언하면 상태값(state)을 담아줍니다.
state에 담겨있는 값 -> (index, count, size, current 등)
*ex02.html 파일
<!DOCTYPE html>
<html xmlns:th="http://www.thymeleaf.org"><!-- 타임리프 명시적 선언 -->
<html>
<head>
<meta charset="UTF-8">
<title>Insert title here</title>
</head>
<body>

	<h3>반복문</h3>
	[[${list}]]

	<ul>
		<li th:each="vo : ${list}">
			[[${vo.name}]]
			[[${vo.age}]]
		</li>
	</ul>

	<hr/>

	<h3>반복문과 state변수(jstl= varState)</h3>
	<!-- each에 두번째 변수를 선언하면 상태값을 담아줍니다. (index, count, size, current등) -->
	<ul>
		<li th:each="vo, a : ${list}">
			[[${a.count}]]번 - [[${vo.name}]]
		</li>
	</ul>


	<h3>반복문과 조건문</h3>
	<ul>
		<li th:each="vo:${list}" th:if="${vo.age % 2 == 0}">
			[[${vo.age + '는 짝수'}]]
		</li>
	</ul>

	<h3>반복문과 조건문2</h3>
	<ul>
		<li th:each="vo:${list}">
			<span th:if="${vo.age % 2 == 0}">짝수</span>
			<span th:unless="${vo.age % 2 == 0}">홀수</span>
		</li>
	</ul>

</body>
</html>
---- 여기서부터는 ex03.html 에서 확인 ----
* th:block 은 제어문을 쓰고싶은데 태그는 딱히 쓰고싶지 않을 때 사용.
- 가짜 태그라고 보면됨.
*a링크에서 @{} 사용법
<!-- 파라미터를 넘길 시 -->
<a th:href="@{/board/view(id = ${board.id})}">글 상세보기</a>


<!-- 파라미터를 여러 개 넘길 시 -->
<a th:href="@{/board/view(id = ${board.id}, writer = ${board.writer}})}">글 상세보기</a>

<!-- PathVariable 사용 시 -->
<a th:href="@{/board/view/{id}(id = ${board.id})}">글 상세보기</a>
위 코드 출처:
https://developer-rooney.tistory.com/181
- 사용 예시
<!--
		a링크로 값을 넘기는 방법
		경로(키=값, 키=값)

		경로/변수/변수(변수=값, 변수=값)
	 -->
	<ul>
		<li th:each="vo : ${list}">
			<a th:href="@{test(age=${vo.age}, name=${vo.name})}">키값넘기기(쿼리스트링)</a>
			<a th:href="@{test2/{age}/{name}(age=${vo.age}, name=${vo.name})}">키값넘기기(쿼리파라미터)</a>
		</li>
	</ul>
- 위에 내용을 받는 컨트롤러
	//쿼리파라미터
	@GetMapping("/test2/{a}/{b}")
	public String test(@PathVariable("a") String a,
					   @PathVariable("b") String b) {

		System.out.println(a);
		System.out.println(b);

		return "view/test";
	}
*ex03.html 파일
<!DOCTYPE html>
<html xmlns:th="http://www.thymeleaf.org"><!-- 타임리프 명시적 선언 -->
<html>
<head>
<meta charset="UTF-8">
<title>Insert title here</title>
</head>
<body>

	<h3>타임리프 block문</h3>
	[[${list}]]

	<hr/>

	<!-- block은 별도의 태그를 사용하지 않고, 마치 중괄호 처럼 사용하고 싶을 때 적용. -->
	<ul>
		<th:block th:each="vo : ${list}">
		<li>[[${vo}]]</li>
		</th:block>
	</ul>

	<hr/>
	<h3>타임리프 a태그</h3>

	<a href="test?a=10">일반a태그</a>
	<a th:href="@{test?a=10}">타임리프a태그</a>

	<!--
		a링크로 값을 넘기는 방법
		경로(키=값, 키=값)

		경로/변수/변수(변수=값, 변수=값)
	 -->
	<ul>
		<li th:each="vo : ${list}">
			<a th:href="@{test(age=${vo.age}, name=${vo.name})}">키값넘기기(쿼리스트링)</a>
			<a th:href="@{test2/{age}/{name}(age=${vo.age}, name=${vo.name})}">키값넘기기(쿼리파라미터)</a>
		</li>
	</ul>

</body>
</html>
---- 여기서 부터는 ex04.html 파일에서 확인 ----
* 자바스크립트에서 타임리프 구문 사용하기
- 스크립트 구문안에 th:inline=javascript 를 안 적어도
값은 받아와 진다.
하지만 단순한 문자열로 받아와짐.
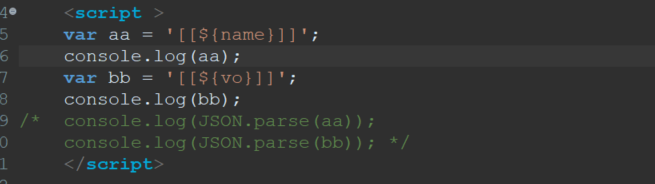

이런 문자열로는 아무것도 못 함.
반면에 스크립트 구문에
th:inline=javascript 를 적어주면,

이렇게 제이슨 형식으로 변환할 수 있는 문자열로 받아와짐.
아래 코드에서 확인해보면 알수있듯이
문자열을 제이슨으로 바꿔주어서 사용하면 된다.
★ JSON.parse() 함수 -> 문자열을 제이슨 형식으로 바꿔줌.
-컨트롤러
	@GetMapping("/ex04")
	public String ex04(Model model) {

		BuilderVO2 vo = new BuilderVO2("이순신", 20);

		model.addAttribute("name","홍길동");
		model.addAttribute("vo", vo);

		return "view/ex04";
	}
-ex04.html
<!DOCTYPE html>
<html xmlns:th="http://www.thymeleaf.org"><!-- 타임리프 명시적 선언 -->
<html>
<head>
<meta charset="UTF-8">
<title>Insert title here</title>
</head>
<body>

	[[${name}]]<br/>
	[[${vo}]]

	<!-- 컨트롤러에서 보내는 값을 JSON 문자열 형태로 받아줍니다. -->
	<script th:inline="javascript">
	var aa = '[[${name}]]';
	var bb = '[[${vo}]]';

	console.log(JSON.parse(aa));
	console.log(JSON.parse(bb));
	</script>

</body>
</html>
---------------------------------------------------------------------------------------------------------------------------------------------------------------
# 타임리프 내장함수

참고:
Thymeleaf Utility Objects (1)
Author: 니용 이전 글에서 Thymeleaf의 기본적인 문법을 확인하였다면, 이번 글에서는 Thymeleaf를 더 심도 있게 활용할 수 있는 방법을 알려드리려고 합니다. Thymeleaf는 Utility Object라고 하는 함수를 기
abbo.tistory.com
*날짜형은 Date 타입 쓰지말고 웬만하면
TimeStamp 나 LocalDateTime.now() 을 사용하기.
- 컨트롤러
//타임리프 내장함수
	@GetMapping("/ex05")
	public String ex05(Model model) {

		//날짜의 형변환은 database, 자바, 화면에서 처리
		model.addAttribute("regdate", LocalDateTime.now()); //날짜형
		return "view/ex05";
	}
-화면
<!DOCTYPE html>
<html>
<head>
<meta charset="UTF-8">
<title>Insert title here</title>
</head>
<body>

	<h3>타임리프 내장함수 (구글링 하세요)</h3>

	[[${regdate}]]

	<br/>
	[[${#temporals.format(regdate, 'yyyy-MM-dd')}]]

	<br/>
	[[${#strings.substring('홍길동', 0, 1)}]]

</body>
</html>
-결과

# 타임리프 문법 include 방식

*th:fragment 로 가져올 부분을 조각내기.
*th:replace 로 조각낸 부분을 가져오기.
- th:replace 가 들어가는 태그가 통째로 대체된다고 생각하면 됨.
★ th:replace="~{경로 :: 가져올 fragment의 이름 }" -> 경로는 절대경로(/) 로 적어주기.
- 가져오는 방법으로 총 3가지 정도 알고있으면 됨 -
1. fragment 를 가져오기
*조각 ( layout01.html)
<!DOCTYPE html>
<html>
<head>
<meta charset="UTF-8">
<title>Insert title here</title>
</head>
<body>

	<div th:fragment="part1">
		<h3>프래그먼트1</h3>
	</div>

	<div th:fragment="part2">
		<h3>프래그먼트2</h3>
	</div>

</body>
</html>
*경로

* 조각 가져오기 (ex06.html)
<!DOCTYPE html>
<html xmlns:th="http://www.thymeleaf.org">
<html>
<head>
<meta charset="UTF-8">
<title>Insert title here</title>
</head>
<body>

	<h3>타임리프 include</h3>

	<!-- fragment를 가져오기 -->
	<!-- 태그자체가 통째로 대체된다고 생각하면 됨. -->
	<div th:replace="~{/include/layout01 :: part1}"></div>
	<th:block th:replace="~{include/layout01 :: part2}"></th:block>

</body>
</html>
2. 파일을 통째로 가져오기.
*가져올 파일
layout2.html
<header>
	<nav>
		<ul>
			<li><a href="#">메뉴</a></li>
			<li><a href="#">메뉴</a></li>
			<li><a href="#">메뉴</a></li>
			<li><a href="#">메뉴</a></li>
		</ul>
	</nav>
</header>
*가져오는 구문
- :: fragment 의 이름 -> 빼주면 파일을 통째로 가져오게됨.
	<!-- 파일을 통째로 가져오려면 ~{경로} -->
	<th:block th:replace="~{/include/layout02}"></th:block>
3. 템플릿화 시켜서 사용하기.
* layout03.html ( 템플릿화 시킨 내용을 가진 파일)
- 겉에 감싸는 태그( th:block , 가상태그 ) 에는
th:fragment 에 fragment 이름으로 함수를 줬다.
함수에는 매개변수를 받을 수 있도록 하여
템플릿화 시킨 구조에서 안에 한 부분을 다른 내용으로 바꿔 낄수 있도록 했다.
- 계속해서 바뀌는 부분이 되는 태그에는
th:replace 에 함수의 매개변수 값이 오도록 했다.
<!DOCTYPE html>
<html xmlns:th="http://www.thymeleaf.org">

<th:block th:fragment="함수(section)">
<head>
<meta charset="UTF-8">
<title>Insert title here</title>
</head>
<body>

	<header>
		공통 템플릿 헤더
	</header>

	<section th:replace="${section}">

	</section>

	<footer>
		공통 템플릿 푸터
	</footer>

</body>
</th:block>

</html>
* ex07.html ( 템플릿구조를 적용 시킬 파일)
- 템플릿에 부분적으로 들어갈 태그(부분)에
id 혹은 class 값을 준다.
- 템플릿에 부분으로 들어가는 태그를 감싸는 태그를 만든다.
감싸는 태그에
th:replace="~{절대경로 :: fragment 이름에 해당하는 함수(~{:: 클래스나, 아이디이름 참조})}
함수의 매개변수 부분에 절대경로를 기재하지 않은 이유는 현재파일의 태그를 참조한다는 의미.
id 는 #아이디값, class는 .클래스값 이렇게 :: (쌍콜론) 뒷부분에 써넣어주면 된다.
위와같이 해주면 템플릿 구조화된 태그의 변경되는 태그 부분에
넣고자 하는 태그가 들어감.
★ 추가 ★
자바스크립트 구문을 사용하고자 한다면
<script> 태그를 , 템플릿 구조를 대체하는 태그의 바깥 부분에 적어줘야 함.
아래 코드 참고.
<!DOCTYPE html>
<html xmlns:th="http://www.thymeleaf.org">

	<!-- ~{파일경로 :: 템플릿함수(~{::선택자})} -->
	<th:block th:replace="~{/include/layout03 :: 함수(~{:: .second})}">

		<div id="first">
			아이디 선택자 #
		</div>

		<div class="second">
			클래스 선택자.
		</div>

	</th:block>

		<script>
			console.log("이 파일에서만 사용")
		</script>
# 오늘 실습 #
*quiz01.html
<!DOCTYPE html>
<html xmlns:th="http://www.thymeleaf.org">

	<th:block th:replace="~{/include/layout03 :: 함수(~{::.wrap})}">

	<h3>이 화면에 진입할 때 SimpleVO를 이용하여 데이터를 출력 합니다. (값은 아무거나)</h3>
	 [[${vo.id}]] <br/>
	 [[${vo.userName}]] <br/>
	 [[${vo.userNum}]]

	<p>
		회원정보확인 링크에는 quiz_result01?키=값 형태로
		회원번호, 이름, 아이디 을 넘겨주세요

		아래 class="wrap" 부분만 layout03 템플릿에 전달 될 수 있도록 처리하세요
	</p>


	<div class="wrap" >
		회원번호: [[${vo.userNum}]]
		이름: [[${vo.userName}]]
		아이디: [[${vo.id}]]
		<br>
		<a th:href="@{quiz_result01(id=${vo.id}, name=${vo.userName}, num=${vo.userNum} )}">회원정보확인</a>
	</div>

	</th:block>

</html>
* layout03.html (템플릿 구조화 파일)
<!DOCTYPE html>
<html xmlns:th="http://www.thymeleaf.org">

<th:block th:fragment="함수(section)">
<head>
<meta charset="UTF-8">
<title>Insert title here</title>
</head>
<body>

	<header>
		공통 템플릿 헤더
	</header>

	<section th:replace="${section}">

	</section>

	<footer>
		공통 템플릿 푸터
	</footer>

</body>
</th:block>

</html>
*SimpleVO.java
package com.simple.basic.command;

import lombok.AllArgsConstructor;
import lombok.Builder;
import lombok.Data;
import lombok.NoArgsConstructor;

@Data
@AllArgsConstructor
@NoArgsConstructor
@Builder
public class SimpleVO {

	private int userNum;
	private String userName;
	private String id;

}
* 컨트롤러
//quiz01 - 실습
	@GetMapping("/quiz01")
	public String quiz01(Model model) {
		SimpleVO vo = SimpleVO
					  .builder()
					  .userName("jordan")
					  .userNum(23)
					  .id("michle")
					  .build();
		model.addAttribute("vo", vo);
		return "view/quiz01";
	}

	//quiz_result01 - 실습
	@GetMapping("/quiz_result01")
	public String quiz_result01(@RequestParam("name") String name,
							    @RequestParam("id") String id,
							    @RequestParam("num") int num,
							    Model model) {

		model.addAttribute("id", id);
		model.addAttribute("name", name);
		model.addAttribute("num", num);

		return "view/quiz_result01";
	}
* quiz_result01.html (전달받은 데이터 출력 페이지)
<!DOCTYPE html>
<html xmlns:th="http://www.thymeleaf.org">
<html>
<head>
<meta charset="UTF-8">
<title>Insert title here</title>
</head>
<body>

	[[${id}]]
	[[${name}]]
	[[${num}]]

</body>
</html>
<기억할것>
#날짜의 형변환
날짜의 형변환은 database, 자바, 화면에서 처리
*날짜의 형변환은 자신 있는 곳에서 하면 되는데
10 중 7,8 은 데이터베이스에서 함.